
There are currently no product reviews.
NOTE: Reviews require prior approval before they will be displayed
NOTE: Reviews require prior approval before they will be displayed

|
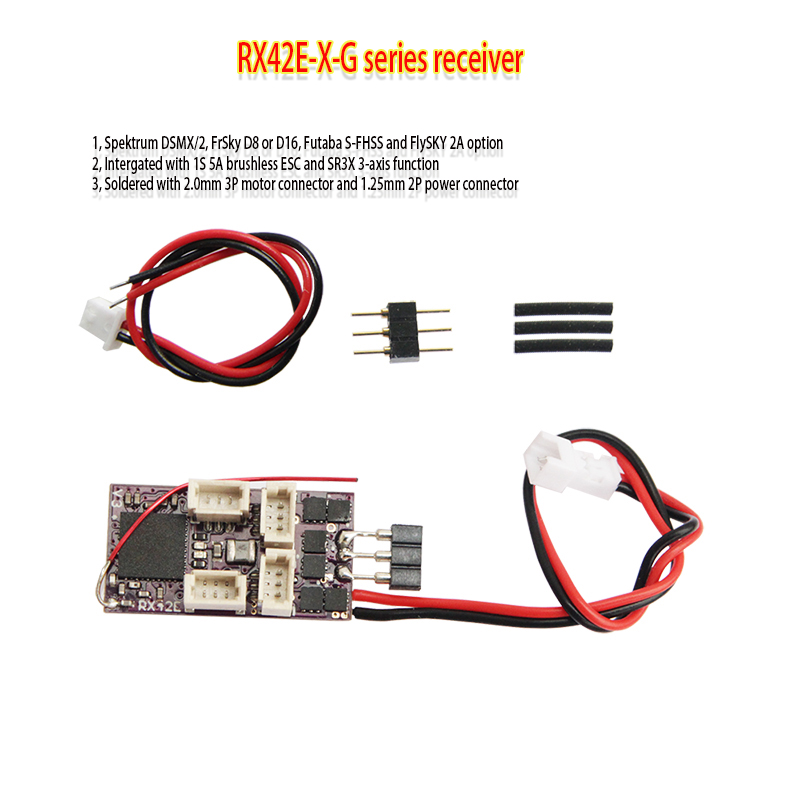
The package forthe receiver includes: 1, one RX42E-X-G receiver with 5A ESC and 3-axis gyro function 2, 3P 2.0mm male connector*1, heat shrink tube *3 3, 2P 1.25mm 2P male power plug and cable *1 The package for progam tool includes: One program tool and related plug cable.
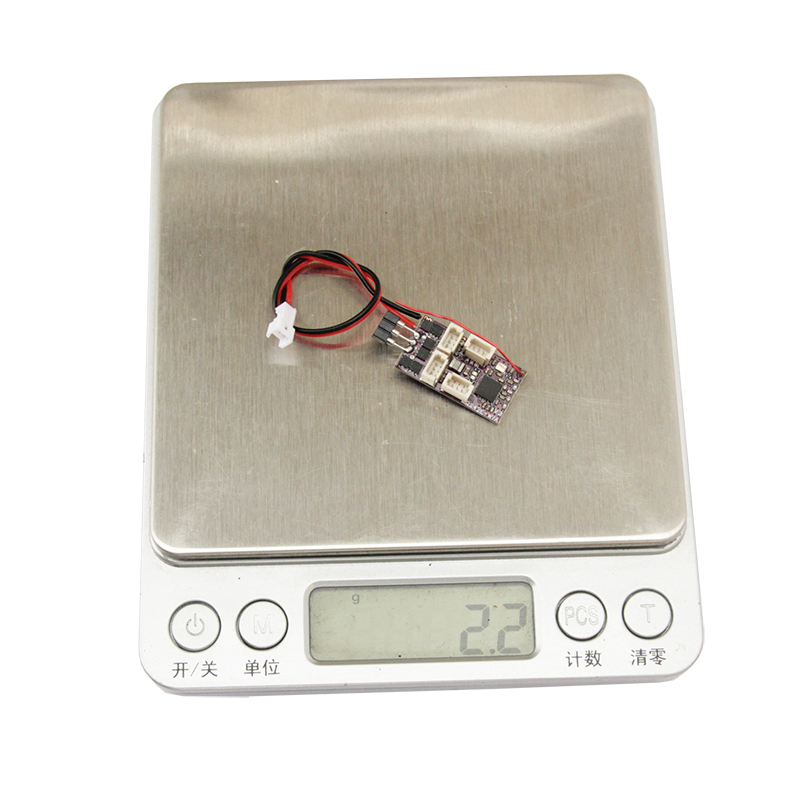
Ma-RX42E-X-G V3.0 is an ultra-micro receiver that integrates 5A/1S brushless ESC and SR3X system. Its volume is only 22.5*12.0*6.5mm. The built-in DCDC boost circuit provides excellent low-voltage performance for the receiver. A total of 6 versions are currently available. Features: Ultra-small size: 22.5*12.0*6.5mm (without antenna); Ultra-light weight: 1.35g (not including power cord and motor terminals); Working voltage: 2.7~4.5V; Built-in 4.5V boost circuit; Support double aileron servo mode (reverse phase, need to use GUI setting); Built-in 5A/1S brushless ESC; Built-in SR3X System (three working modes: OFF, Low sensitivity, High sensitivity); Excellent low-voltage working performance; Auto Binding; D, F2, A2 versions support TELEM function; 1.00mm 3P steering gear interface; Support online firmware upgrade; Support GUI setting function;
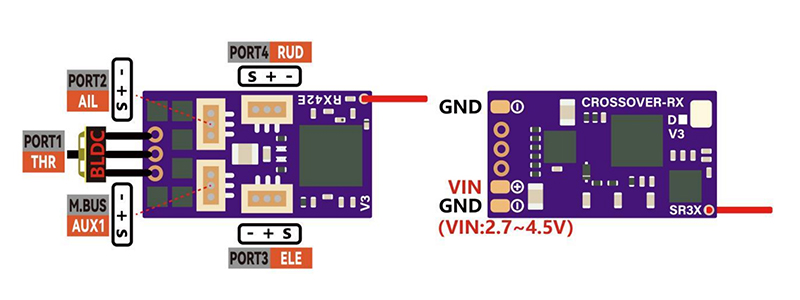
Interface:
Please note that M.BUS AUX1 port can be used for plugging the program tool.
Double-Aileron Mode: Double-aileron mode is developed for those model airplanes using double ailerons. This function can simplify servo wiring connection and transmitter set up. The user can set the M.BUS port on the GUI as the AIL channel of the inverted output, then the double aileron servo mode can be turned on.
Auto Binding: As it is difficult to reach the binding button when the receiver has been installed inside the plane, we developed self-binding function, it works like this: The receiver will enter binding mode automatically after powered and no signal for 15 seconds (slow flashing LED light turns to fast flashing), then complete the binding operation according to your transmitter binding manual.
TELEM Function (only D, F2, A2 version support): TELEM function is useful on monitoring battery voltage, receiver working voltage and its signal strength as well as its working temperature in real-time, through which customer can get working state of the receiver and battery discharging state under control, so flying out of control range and over discharging will rarely happen ( for brushless motor rotation speed or flight height monitoring, customer needs to choose a more advanced receiver) NOTE: The effective control range of TELEM function depends on transmitter, it is possible that this would happen: the working range of the receiver is far more than TELEM function effective range, it is normal and alright!
SR3X System: The SR3X system is an auxiliary flight system developed for RC airplane. It can help beginners better control the RC airplane., and can also help master pilots better stabilize the flight attitude. The SR3X system is divided into three working modes: off, low-sensitivity working mode, and high-sensitivity working mode. The fifth channel (set to the third switch) is used to determine the working mode of the SR3X. The blue LED on the AR3207G-X is used to indicate the SR3X working mode: 1) LED OFF means the SR3X system is off; 2) LED ON means the SR3X system is working in low-sensitivity mode; 3) LED Flashing means the SR3X system is working in the high-sensitivity mode. M.BUS Interface: M.BUS interface is a multi-function interface: 1) FW upgrade/Function setting interface; 2) Output channel signal; 3) Output SBUS signal; 4) Connect other sensors (under development); Note: It is forbidden to connect the battery to the receiver when the PC is connected to the M.BUS
interface. How to connect RX to GUI software:
(Download link: update.crossover-rx.com/mxo.zip)
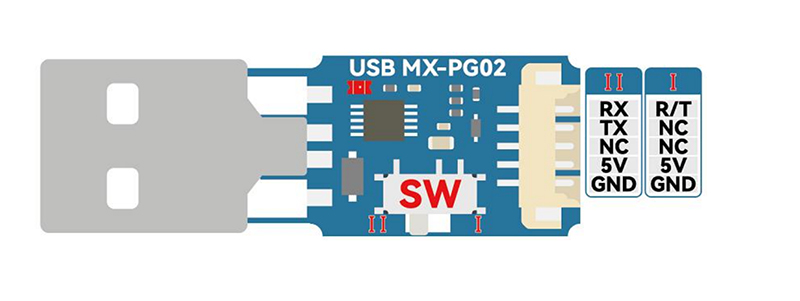
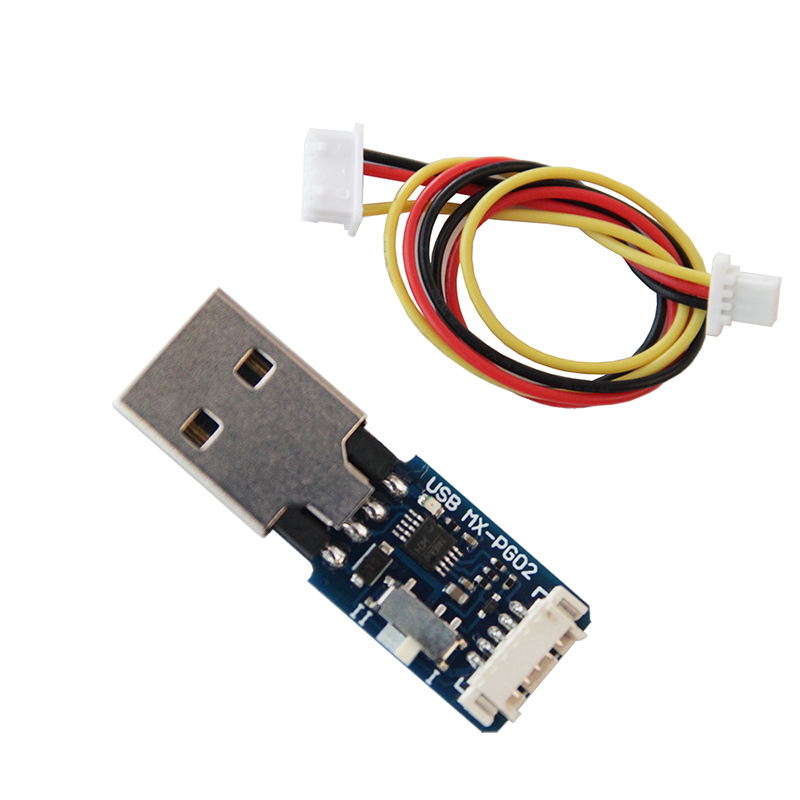
The user needs a USB programmer (USB MX-PG02, when used on Ma-RX42E-X V3.0, the switch on the programmer is set to the I position) before using the GUI software to configure the receiver function or upgrade the firmware. Connect one end of the USB programmer to the M.BUS port of the receiver, and the other end to the PC. After opening the GUI software, select the correct port, click "Connect", and then the various configurable function modules on the receiver will be loaded and displayed. The current setting information of the machine
There are currently no product reviews.
NOTE: Reviews require prior approval before they will be displayed All goods are not marked are three packs of shops Customer Videos: See all 0 videos
Customer Images: See all 0 images
This product was added to our catalog on Saturday 25 March, 2023. |